
This article is no longer updated.
Please go to our new Intercom knowledge base to ensure you're seeing the most recent version.
The link above takes you directly to the equivalent article on Intercom.
When enrolling an individual student, you can send the fee to billing at that time. See Add Ensemble Enrolments for details.
But you can also send enrolment fees to billing in bulk. This will be necessary as part of your regular billing cycle, and can also be used selectively if you have just enrolled a group of students into ensembles or classes.
The script is found at Common Tasks > Billing > Send Ensemble/Class fees to Accounts File.
Overview
The script will collect all the records of students that are still enrolled in an ensemble (i.e. no Finish Date) and send the fees to the Student Accounts file. In that file, you can print invoices for all amounts owing, including instrument hire, exam fees, camp fees, etc. or you can export the data for your accounts department.
Like all the billing scripts, the process is in two basic stages:
- Use the Find function, and other refinements if needed, to select records in the Ensembles file to be billed
- Generate a corresponding set of records in the Student Accounts file
Scripts Steps
The script will work through a number of steps:
First it will check whether you want to include PENDING enrolments in your search. If you are billing in advance and including students whose enrolment does not start until the beginning of an upcoming term, you will generally need to say Yes to this.
You will then come to the Find screen.

If you selected to include Pending enrolments, you will see two lines, one for "Current" and one for "Pending" in the Status field. Otherwise only one line. If you wish to modify the search criteria, you can do that here.
Select Perform Find. It will FIND all the records defined by your criteria and take you to a screen where you can preview the records as a table. On this screen you can check the records (before sending them) and make any corrections, if necessary.
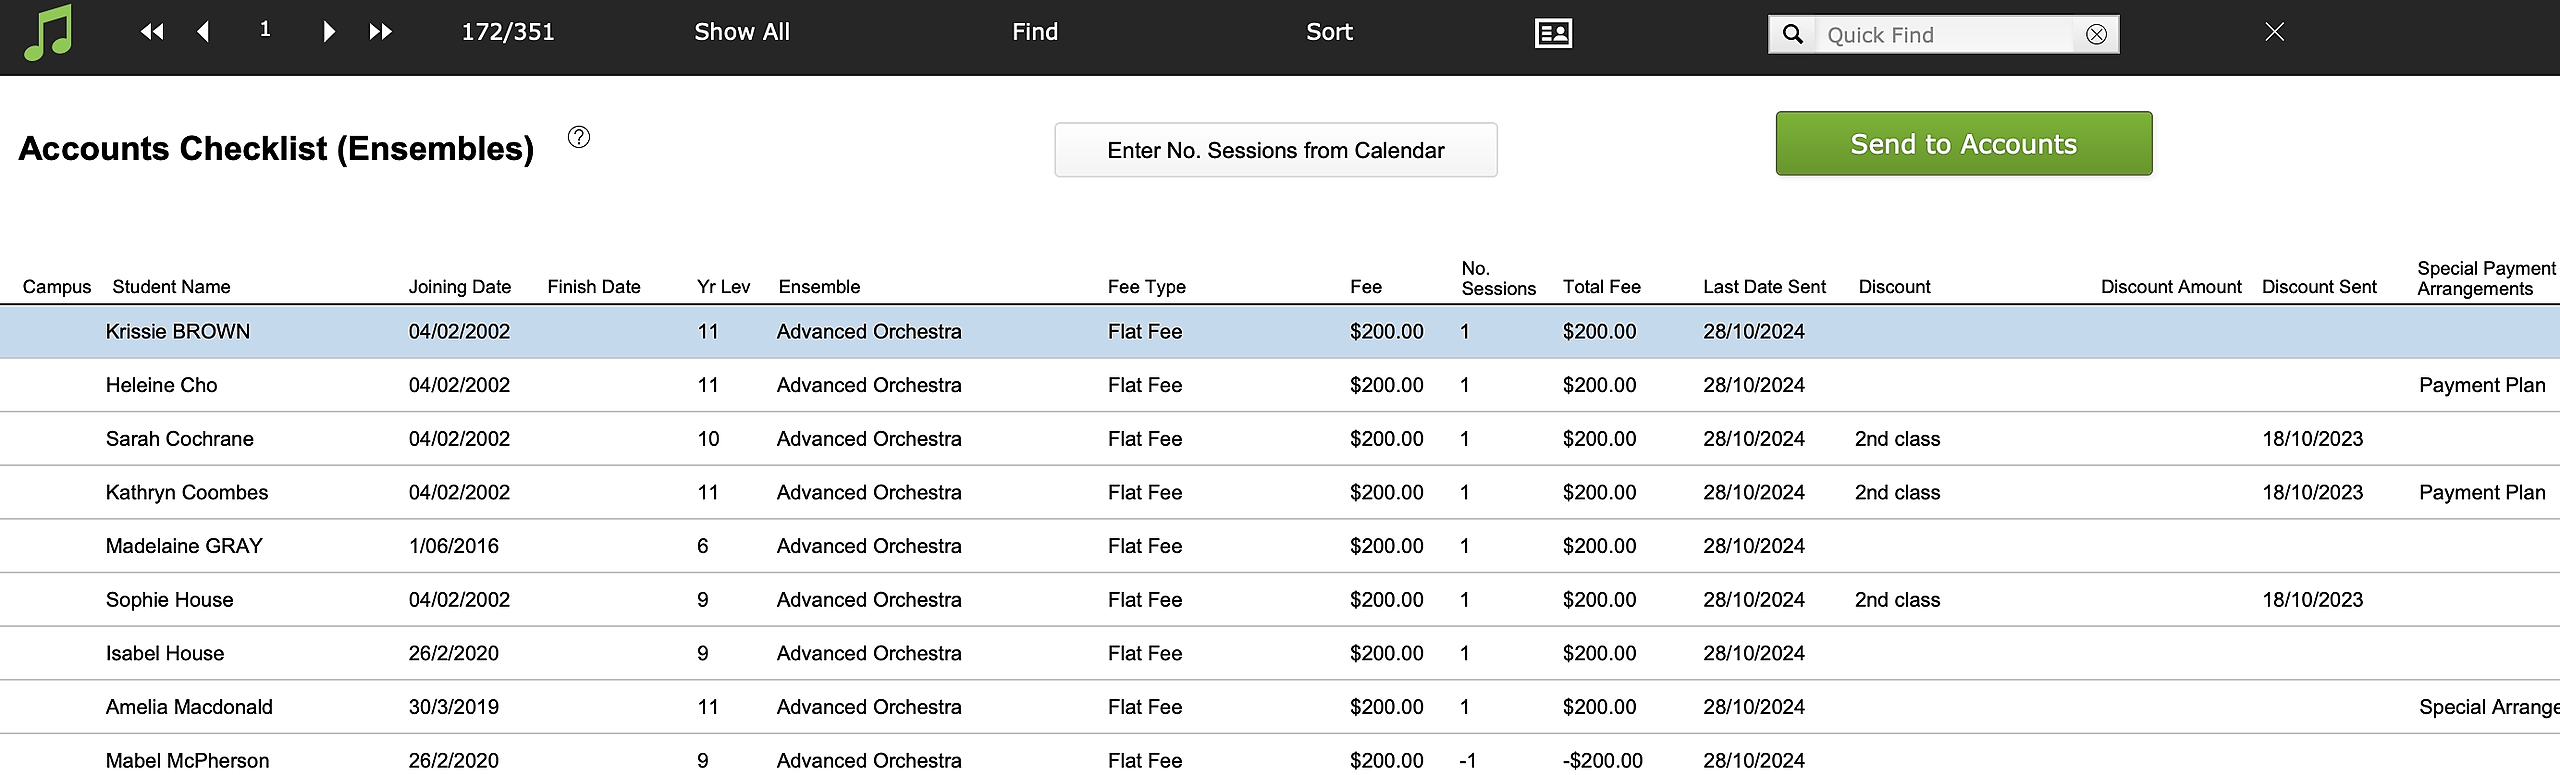
NOTE: The records will be automatically sorted by Ensemble Name and then Student Last Name - however, you can re-sort by simply selecting the column headings.
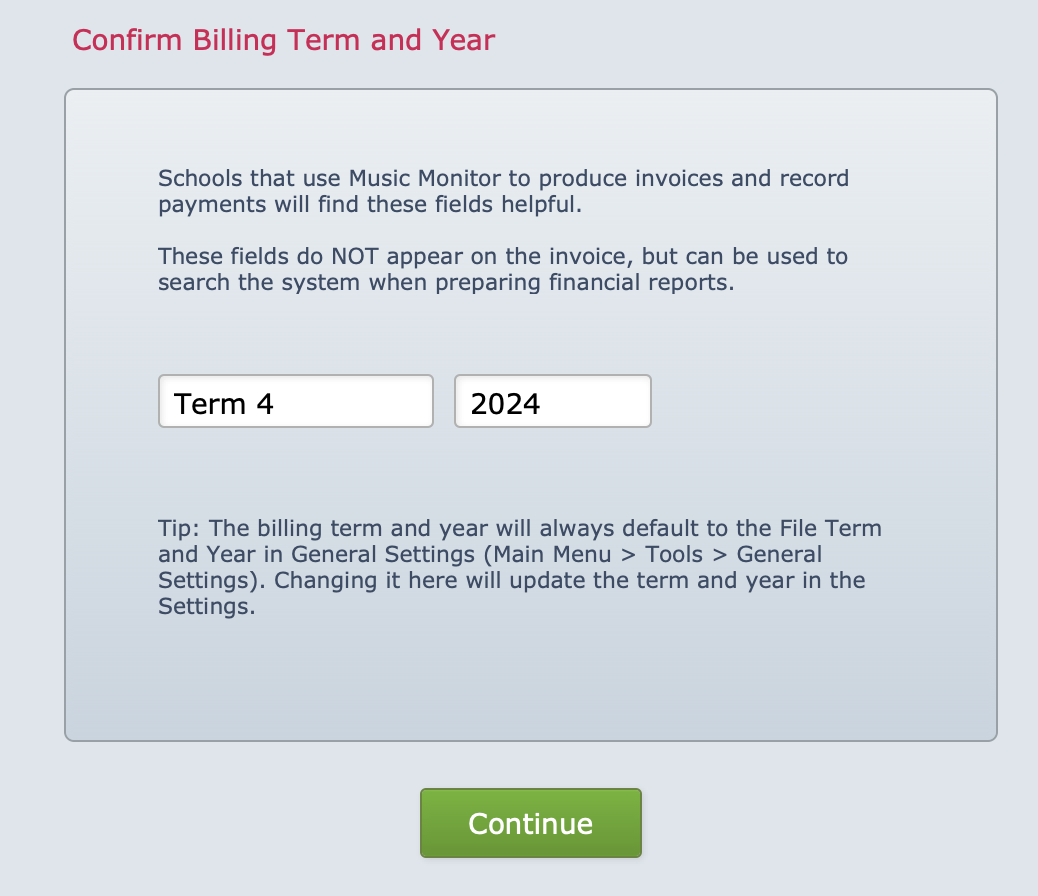
Select the green Send to Accounts at the top right of your screen and you will see a window where you can enter the current billing period.

For example, if you are sending records across to the Accounts file to be billed for Terms 1 & 2, type this in the box. This will appear on any exports or invoices produced from these records.
Select Continue.
The Student Accounts file will then import the data from this file (the found set) and create new billing records (these new records are no longer attached to this file.)
NOTE: At this point, today's date will be entered in the Last Sent To Accounts field for all these records in the Ensembles file.
You will be asked to confirm the Term and Year again. This data is entered in fields on the billing record that are helpful for searching later.
Finally, you will be taken to the Student Accounts screen where you can check the records just imported.
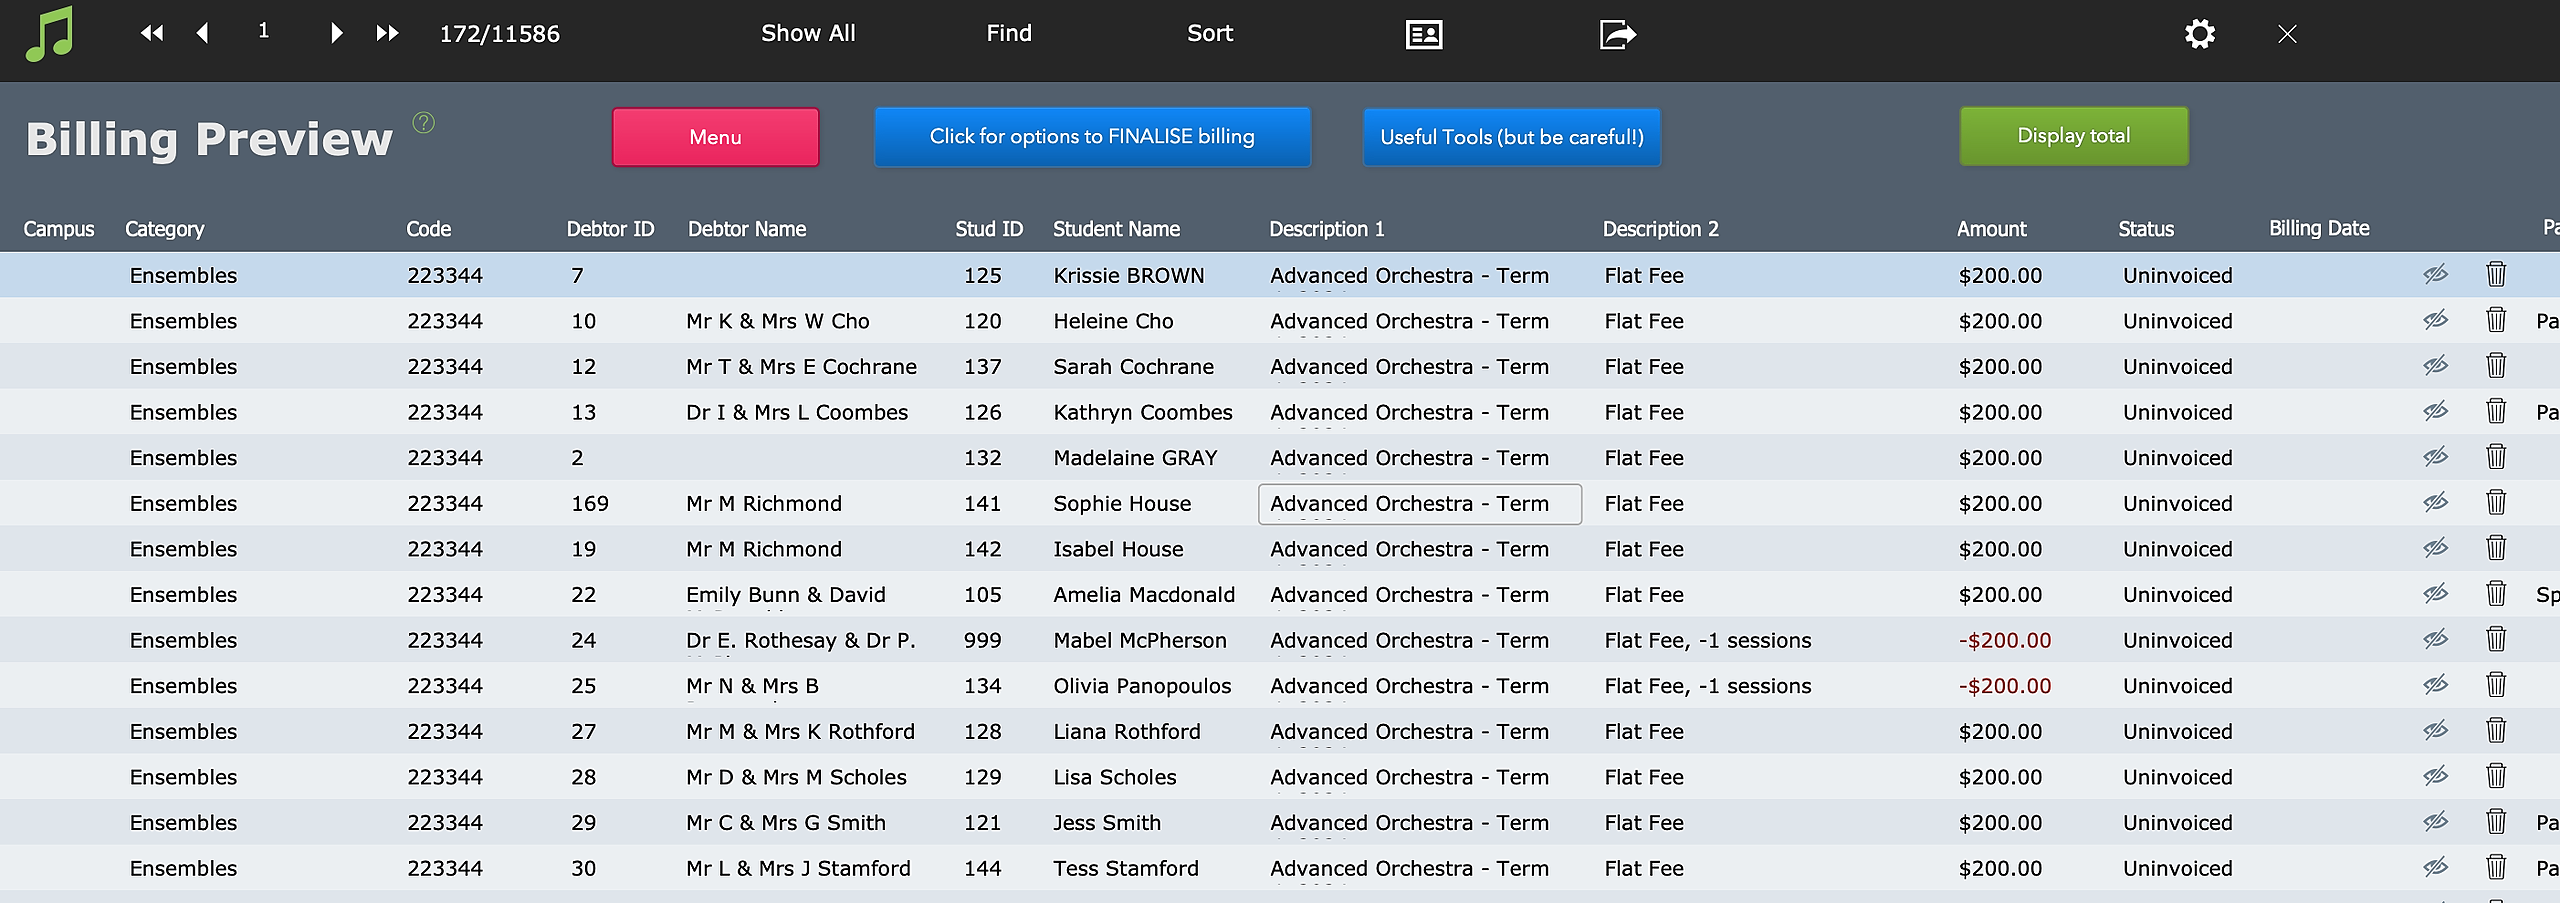
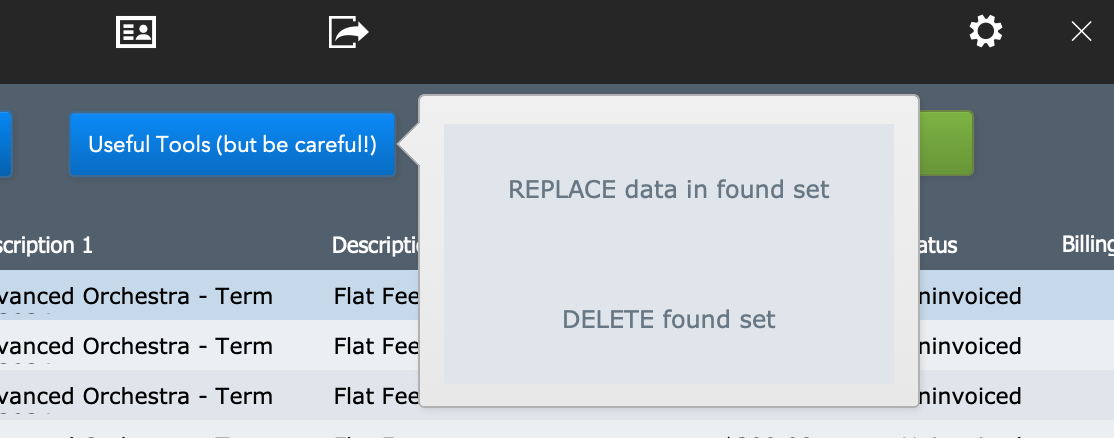
These billing records HAVE now been created. If there is an error, you should delete or edit the record. If the entire set of records is erroneous, there are tools in the blue Useful Tools (but be careful) button to perform bulk actions on these records.
You now have the option to generate invoices or export for your accounts department using the blue Click for options to FINALISE billing button.
However, if you are going to produce more billing lines of other kinds and prefer to finalise all of them in one batch, you can simply close this window. Later, you can use the script at Common Tasks > Billing > Process all unbilled amounts to find and finalise all your billing lines. See Process All Unbilled Amounts for guidance.
See below for considerations relating to this process.
Number of sessions
The Number of Sessions field on each enrolment should reflect the amount of fee units you wish to charge for. There are two usual set ups:
- Number of Sessions is equal to the number of times the ensemble meets.
- Number of Sessions is set to "1" is the ensemble is charged at a flat rate.
Timing considerations
This billing process is usually conducted once a term (or semester) at one of the following times:
- Before the start of term
- In the first three weeks of term
- At the end of term (in arrears)
Depending on the timing, different factors should be considered.
Before the start of term
If this process is being run before the start of term, some or all of the enrolments may be "Pending" rather than "Current". It will be important to select to include "Pending" records at the start of the script.
In the first three weeks of term
Though almost all enrolments should be "Current", any enrolments that were given a later enrolment date may still be "Pending". Additionally, it is possible that some students that started the term enrolled in the ensemble have finished; if these students are to be charged, the find request will need to be altered to suit.
At the end of term (in arrears)
When billing at the end of term, no "Pending" enrolments will need to be included. However, some enrolments that were active during the term may now be "Archived" the find request will need to be edited to include these enrolments. This can be done by adding a find request that searches for records with Status "Archived" and Finish Date ">X" (where "X" is the start date of term).