
To add a hire bond to a loan, first, use the binoculars on the loan to enter the Hire Form Layout.
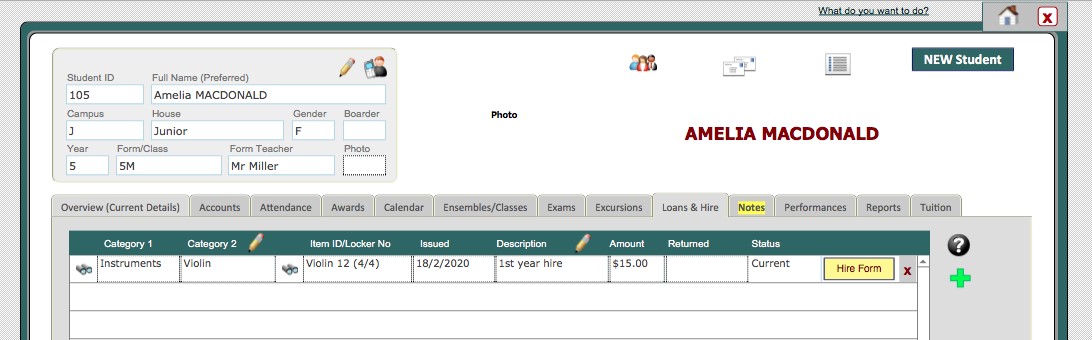
On the next screen, you will see four fields at the bottom. Bond Description, Bond Amount, Date Sent and Refund Sent.

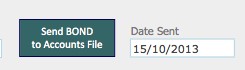
Click the green Send BOND to Accounts file button, follow the prompts, and a new line item will be entered in the Student Accounts file. It will automatically enter the Bond Description (eg. Bond Internal) in Description 1 and the instrument (eg. Violin) in Description 2. Click 'Continue' to return to the original screen, and you will see that today's date has been automatically entered in the Date Sent field.
The line item that has been entered in the Accounts file will sit there, uninvoiced, until you 'Process Billings', or create a new invoice for that one debtor, OR add to an existing invoice for that one debtor.
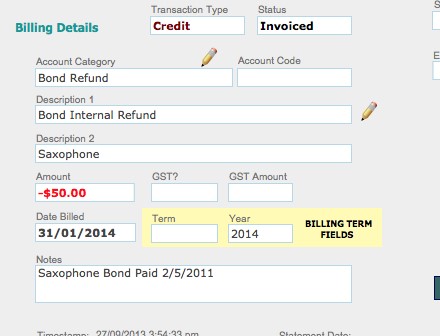
When the instrument is returned, enter a return date in the portal row in the Student Accounts file, click the binoculars again, and click the green Send REFUND to Accounts file button. Again, a new line item will be entered in the Accounts file. This time, the Bond Description and the word 'Refund' will be entered in Description 1 (eg. Bond Internal Refund) and again, the instrument will be entered in Description 2. The amount this time will be a NEGATIVE amount (eg. -$50). Click 'Continue' to return to the original screen, and today's date will have been automatically entered in the Refund Sent field.
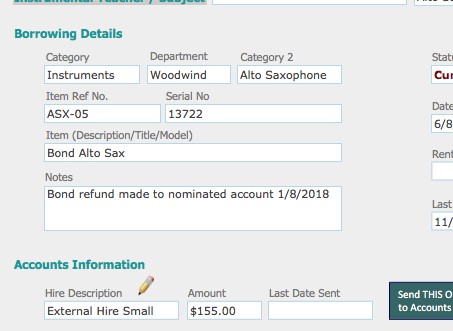
If you need to enter additional information, this can be added in the Notes field of the Hire record.
OR by clicking the arrow at the left of the Student Accounts line and entering a note there.
Refund Bond Immediately
By default, when a bond is refunded, it is applied as a credit on the next invoice. If, instead, you wish to refund the bond immediately to the debtor’s bank account or credit card, you will need to preform several actions inside Music Monitor as well.
After the bond refund has been executed (either by refunding the money, or by sending the order to your accounts department), go to either the Accounts Tab in the Students File or the Line Items Tab in the Debtors File.
Find the bond refund’s line item and change the Category to ‘Refund’. This will prevent the amount from being included in the Debtor balance.
Then, enter the date in the ‘Date Billed’ field. This will prevent the amount from being included on a future invoice.
It is also recommended that you switch into the Line Item Form Layout by clicking the binoculars icon, and enter details on the payment in the ‘Notes’ field.
| Transfer Bond to Another Instrument |
When an instrument is returned and another instrument of the same type is issued, Music Monitor will automatically enter the ‘Bond Description’ and ‘Date Bond Sent’ to accounts on the new record. It will also automatically look up the ‘Bond Amount’ from the Hire Fees Table (this can be manually changed afterwards).
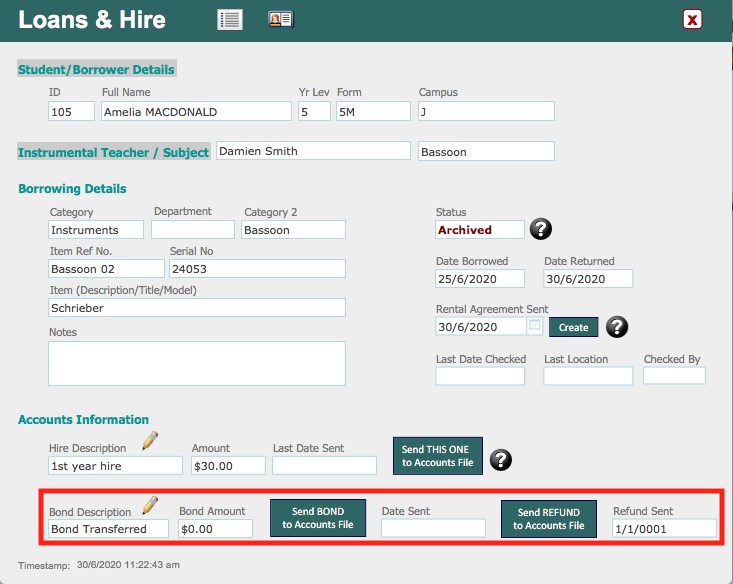
A ‘Hire Description’ of ‘Bond Transferred’ should be created in the Hire Fees table. This can then be selected for the original instrument and a Bond Refunded Date will automatically enter. This date will always be ‘01/01/0001’.